AEG B4101-4-W Manual do Utilizador
Consulte online ou descarregue Manual do Utilizador para não AEG B4101-4-W. Aeg B4101-4-BUK User Manual Manual do Utilizador
- Página / 48
- Índice
- MARCADORES
- COMPETENCE B4101-4 1
- 3 Useful tips and hints 2
- 2 Environmental information 2
- 1 Safety instructions 2
- Contents 3
- Operating Instructions 5
- Disposal 6
- 2 Old appliance 6
- Description of the Appliance 7
- Control Panel 8
- Oven Features 8
- Oven Accessories 9
- Initial Cleaning 11
- Operating the Oven 12
- 3 Cooling fan 12
- Oven Functions 13
- 3 Anti-tip device 14
- 1 Warning: Risk of burning! 15
- Clock Functions 16
- Usage, Tables and Tips 22
- Baking Tables 24
- Tips on Baking 27
- Table: Desserts 28
- Frozen Ready Meals Table 28
- Roasting 29
- Grill sizes 33
- Grilling table 33
- Defrosting 34
- Defrosting table 34
- Making Preserves 35
- Preserves table 36
- Cleaning and care 37
- Oven Interior 38
- Shelf Support Rails 39
- Oven Lighting 40
- Oven Door 41
- Oven Door Glass 42
- What to do if … 44
- Electrical Connection 45
- 1 This oven must be earthed! 45
- Warranty conditions 46
- Service and Spare Parts 47
Resumo do Conteúdo
COMPETENCE B4101-4Built-In Electric OvenUser information
10Before using for the first timeSetting and changing the current time3 The oven only operates when the time has been set.When the appliance has been
11Initial CleaningYou should clean the oven before using it for the first time.1 Caution: Do not use any caustic, abrasive cleaners! The surface could
12Operating the Oven3The oven is equipped with retractable buttons for “Oven functions” and “Temperature selection”. To use, press the relevant button
13Oven FunctionsThe oven has the following functions:Oven function UseHeating element/fanOven Light With this function you can light up the oven inte
14Inserting the shelf and roasting pan3 Anti-tip deviceAll insertable components have a small curved indentation on their left and right edges. This i
15Attaching/Removing the Grill Pan HandleThe handle is particularly useful for removing the grill pan and tray more easily from the hot oven.Attaching
16Clock Functions CountdownTo set a countdown. A signal sounds after the time has elapsed.This function does not affect the operation of the oven.Cook
173 How to use the clock functions• When a function has been selected, the corresponding function indi-cator flashes for approx. 5 seconds. During thi
18Countdown1.Press Selection button repeated-ly, until the function indicator Countdown flashes.2.Using the or button, set the required Countdo
19Cook time1.Press Selection button repeated-ly, until the function indicator Cook time flashes.2.Using the or button, set the required cooking
2Dear Customer,Please read this user information carefully and keep it to refer to later.Please pass the user information on to any future owner of th
20End time1.Press Selection button repeated-ly, until the function indicator End time flashes.2.Using the or button, set the required switch-of
21Cook time and End time combined3 Cook time and End time can be used simultaneously, if the oven is to be automatically switched on and off at a
22Usage, Tables and TipsBakingOven function: Pizza Setting , Ventitherm ® Fan Operated Cooking or Conventional Cooking .Baking tins• For Conventional
23General Instructions• Insert the tray with the bevel at the front.• With Conventional Cooking or Pizza Setting you can also bake with two tins nex
24Baking TablesCakes, Biscuits, Bread, PiesOven functionsShelf-positionTempera-tureºCTimeHr. : Min.Using cake tinsCakes in Pound Cake tins Pizza Setti
25Apple strudel Pizza Setting 2 170-1801)0:30-0:50Choux pastry bunsConventional Cook-ing3 200-2101)0:20-0:35Buns / cup cakes Pizza Setting 3 150-1601)
26Baking on more than one oven level Type of bakingPizza SettingVentitherm ® Fan Oper-ated CookingTimeHours: Mins.Shelf positions from bot-tomTempe-ra
27Tips on Baking Baking results Possible cause RemedyThe cake is not browned enough at the bottomWrong oven level Place cake on a lower shelfThe cake
28Table: Desserts Frozen Ready Meals Table DessertsVentitherm ® Fan Operat-ed CookingTimeShelf positionTempera-ture °CHr. : Min.Apple pie 2 180-190 0:
29RoastingOven function: Ventitherm ® Fan Operated Cooking , Conven-tional Cooking or Rotitherm Roasting .Roasting dishes• Any heat-resistant ovenwar
3ContentsOperating Instructions. . . . . . . . . . . . . . . . . . . . . . . . . . . . . . . . . . . . . 5Safety instructions. . . . . . . . . . . . .
30Table: Meat, roasting, casserolesMeat Oven functionsShelf positionTempera-ture°CTimeHr. : Min.Pork Shoulder; leg; rolled; boned spare rib; loin of p
31Table: Roasting, casseroles, au gratinPoultry, Game, Fish, VegetablesQuantity approx.Oven function Shelf positionTempera-ture°CTimeHr. : Min.Cassero
32 Fisch (baked, steamed) Whole fish 1-1.5 kg/ 2-3 lbsConven-tional Cooking2 210-220 0:45-1:15Fish pies, bakes 750 g-1 kg/1.5-2 lbsRotitherm Roasting3
33Grill sizesOven function: Single Economy Grill or Full Width Dual Grill with maximum temperature setting1 Important: Always grill with the oven do
34DefrostingOven function: Fan Controlled Defrosting (no temperature set-ting)• Unpack the food and place it on a plate on the oven shelf.• Do not co
35Making PreservesOven function: Base Heat Finishing• For preserving, use only commercially available preserve jars of the same size.• Jars with twist
36Preserves tableThe times and temperatures for making preserves are for guidance only.PreserveTemperaturein°CCooking time until simmeringin mins.Cont
37Cleaning and care1Warning: For cleaning, the appliance must be switched off and cooled down.Warning: For safety reasons, do not clean the appliance
38Oven InteriorOven lightingYou can switch on the oven light to make cleaning easier.CleaningThe walls that have a catalytic coating are self-cleaning
39Shelf Support RailsThe shelf support rails on the left and right hand sides of the oven can be removed for cleaning the side walls.Removing the shel
4Cleaning and care . . . . . . . . . . . . . . . . . . . . . . . . . . . . . . . . . . . . . . . . . . . . . . 37Outside of the appliance. . . . . . .
40Oven Lighting1 Warning: There is a danger of electric shock! Prior to changing the oven light bulb:– Switch off the oven!– Disconnect from the elect
41Oven DoorThe oven door of your appliance may be removed for cleaning.Removing the oven door1.Open the oven door completely.2.Completely fold back th
42Oven Door GlassThe oven door is fitted with three glass panels mounted one behind the other. The inner panels may be removed for cleaning.1 Warning:
43Inserting the middle glass panel1.Insert the middle glass panel at an angle from above into the section of the door in which the handle is located.
44What to do if … If you are unable to remedy the problem by following the above suggestions, please contact your local Service Force Centre.1 Warning
45Electrical ConnectionThe oven is designed to be connected to 230-240V~(50Hz) electricity supply.The oven has an easily accessible terminal block whi
46Warranty conditionsGreat BritainStandard guarantee conditionsWe, AEG, undertake that if within 12 months of the date of the purchase this AEG applia
47Service and Spare PartsIf the event of your appliance requiring service, or if you wish to pur-chase spare parts, please contact Service Force by te
From the Electrolux Group. The world´s No.1 choice.The Electrolux Group is the world´s largest producer of powered appliances for kitchen, cleaning an
5Operating Instructions1 Safety instructions5This appliance conforms with the following EU Directives:– 73/23/EEC dated 19.02.1973 Low Voltage Directi
6How to avoid damage to the appliance• Do not line the oven with aluminium foil and do not place baking trays, pots, etc. on the oven floor, as the he
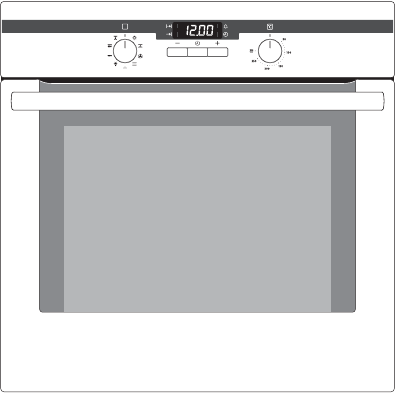
7Description of the ApplianceGeneral Overview Full glass doorControl panelDoor handle
8Control Panel Oven FeaturesAll of the interior walls of the oven are coated in a special enamel (catalytic coating). Oven Power Indicator Temperature
9Oven AccessoriesCombination shelf For dishes, cake tins, items for roasting and grilling.Baking Shelf For baking or for collecting fatGrill pan with
Mais documentos para não AEG B4101-4-W


Manuais e produtos relacionados com não AEG B4101-4-W

 (32 páginas)
 (80 páginas)
 (52 páginas)
(48 páginas)
(52 páginas)
(48 páginas)
 (36 páginas)

 (56 páginas)


 (8 páginas)
(60 páginas)
(60 páginas)
(8 páginas)
(60 páginas)
(60 páginas)
 (56 páginas)
(36 páginas)
(56 páginas)
(36 páginas)
 (60 páginas)
(32 páginas)
(32 páginas)
(4 páginas)
(60 páginas)
(32 páginas)
(32 páginas)
(4 páginas)
 (20 páginas)
 (40 páginas)
© 2020, manymanuals-pt.com. Todos os direitos reservados. | 0.058 s |
 Manymanuals.com
 Manymanuals.de
 Manymanuals.fr
 Manymanuals.it
 Manymanuals.pl
 Manymanuals.cz
 Manymanuals.es
 Manymanuals-pt.com
Comentários a estes Manuais